This article is more than one year old. Older articles may contain outdated content. Check that the information in the page has not become incorrect since its publication.
Kubernetes-in-Kubernetes and the WEDOS PXE bootable server farm
When you own two data centers, thousands of physical servers, virtual machines and hosting for hundreds of thousands sites, Kubernetes can actually simplify the management of all these things. As practice has shown, by using Kubernetes, you can declaratively describe and manage not only applications, but also the infrastructure itself. I work for the largest Czech hosting provider WEDOS Internet a.s and today I'll show you two of my projects — Kubernetes-in-Kubernetes and Kubefarm.
With their help you can deploy a fully working Kubernetes cluster inside another Kubernetes using Helm in just a couple of commands. How and why?
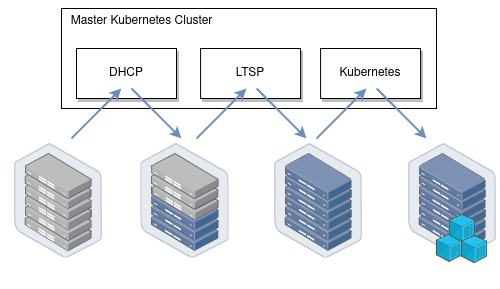
Let me introduce you to how our infrastructure works. All our physical servers can be divided into two groups: control-plane and compute nodes. Control plane nodes are usually set up manually, have a stable OS installed, and designed to run all cluster services including Kubernetes control-plane. The main task of these nodes is to ensure the smooth operation of the cluster itself. Compute nodes do not have any operating system installed by default, instead they are booting the OS image over the network directly from the control plane nodes. Their work is to carry out the workload.

Once nodes have downloaded their image, they can continue to work without keeping connection to the PXE server. That is, a PXE server is just keeping rootfs image and does not hold any other complex logic. After our nodes have booted, we can safely restart the PXE server, nothing critical will happen to them.

After booting, the first thing our nodes do is join to the existing Kubernetes cluster, namely, execute the kubeadm join command so that kube-scheduler could schedule some pods on them and launch various workloads afterwards. From the beginning we used the scheme when nodes were joined into the same cluster used for the control-plane nodes.

This scheme worked stably for over two years. However later we decided to add containerized Kubernetes to it. And now we can spawn new Kubernetes-clusters very easily right on our control-plane nodes which are now member special admin-clusters. Now, compute nodes can be joined directly to their own clusters - depending on the configuration.

Kubefarm
This project came with the goal of enabling anyone to deploy such an infrastructure in just a couple of commands using Helm and get about the same in the end.
At this time, we moved away from the idea of a monocluster. Because it turned out to be not very convenient for managing work of several development teams in the same cluster. The fact is that Kubernetes was never designed as a multi-tenant solution and at the moment it does not provide sufficient means of isolation between projects. Therefore, running separate clusters for each team turned out to be a good idea. However, there should not be too many clusters, to let them be convenient to manage. Nor is it too small to have sufficient independence between development teams.
The scalability of our clusters became noticeably better after that change. The more clusters you have per number of nodes, the smaller the failure domain and the more stable they work. And as a bonus, we got a fully declaratively described infrastructure. Thus, now you can deploy a new Kubernetes cluster in the same way as deploying any other application in Kubernetes.
It uses Kubernetes-in-Kubernetes as a basis, LTSP as PXE-server from which the nodes are booted, and automates the DHCP server configuration using dnsmasq-controller:
How it works
Now let's see how it works. In general, if you look at Kubernetes as from an application perspective, you can note that it follows all the principles of The Twelve-Factor App, and is actually written very well. Thus, it means running Kubernetes as an app in a different Kubernetes shouldn't be a big deal.
Running Kubernetes in Kubernetes
Now let's take a look at the Kubernetes-in-Kubernetes project, which provides a ready-made Helm chart for running Kubernetes in Kubernetes.
Here is the parameters that you can pass to Helm in the values file:
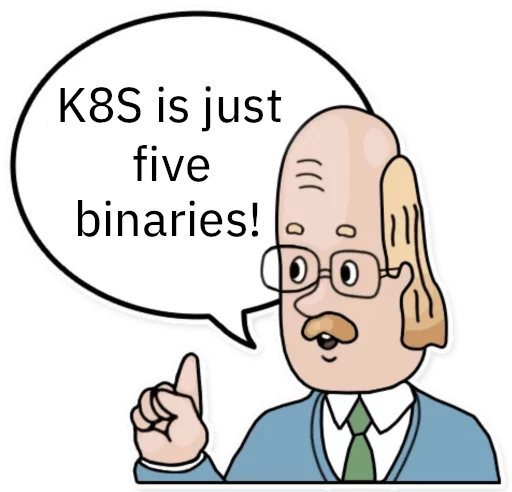
Beside persistence (storage parameters for the cluster), the Kubernetes control-plane components are described here: namely: etcd cluster, apiserver, controller-manager and scheduler. These are pretty much standard Kubernetes components. There is a light-hearted saying that “Kubernetes is just five binaries”. So here is where the configuration for these binaries is located.
If you ever tried to bootstrap a cluster using kubeadm, then this config will remind you it's configuration. But in addition to Kubernetes entities, you also have an admin container. In fact, it is a container which holds two binaries inside: kubectl and kubeadm. They are used to generate kubeconfig for the above components and to perform the initial configuration for the cluster. Also, in an emergency, you can always exec into it to check and manage your cluster.
After the release has been deployed, you can see a list of pods: admin-container, apiserver in two replicas, controller-manager, etcd-cluster, scheduller and the initial job that initializes the cluster. In the end you have a command, which allows you to get shell into the admin container, you can use it to see what is happening inside:

Also, let's take look at the certificates. If you've ever installed Kubernetes, then you know that it has a scary directory /etc/kubernetes/pki with a bunch of some certificates. In case of Kubernetes-in-Kubernetes, you have fully automated management of them with cert-manager. Thus, it is enough to pass all certificates parameters to Helm during installation, and all the certificates will automatically be generated for your cluster.

Looking at one of the certificates, eg. apiserver, you can see that it has a list of DNS names and IP addresses. If you want to make this cluster accessible outside, then just describe the additional DNS names in the values file and update the release. This will update the certificate resource, and cert-manager will regenerate the certificate. You'll no longer need to think about this. If kubeadm certificates need to be renewed at least once a year, here the cert-manager will take care and automatically renew them.

Now let's log into the admin container and look at the cluster and nodes. Of course, there are no nodes, yet, because at the moment you have deployed just the blank control-plane for Kubernetes. But in kube-system namespace you can see some coredns pods waiting for scheduling and configmaps already appeared. That is, you can conclude that the cluster is working:

Here is the diagram of the deployed cluster. You can see services for all Kubernetes components: apiserver, controller-manager, etcd-cluster and scheduler. And the pods on right side to which they forward traffic.
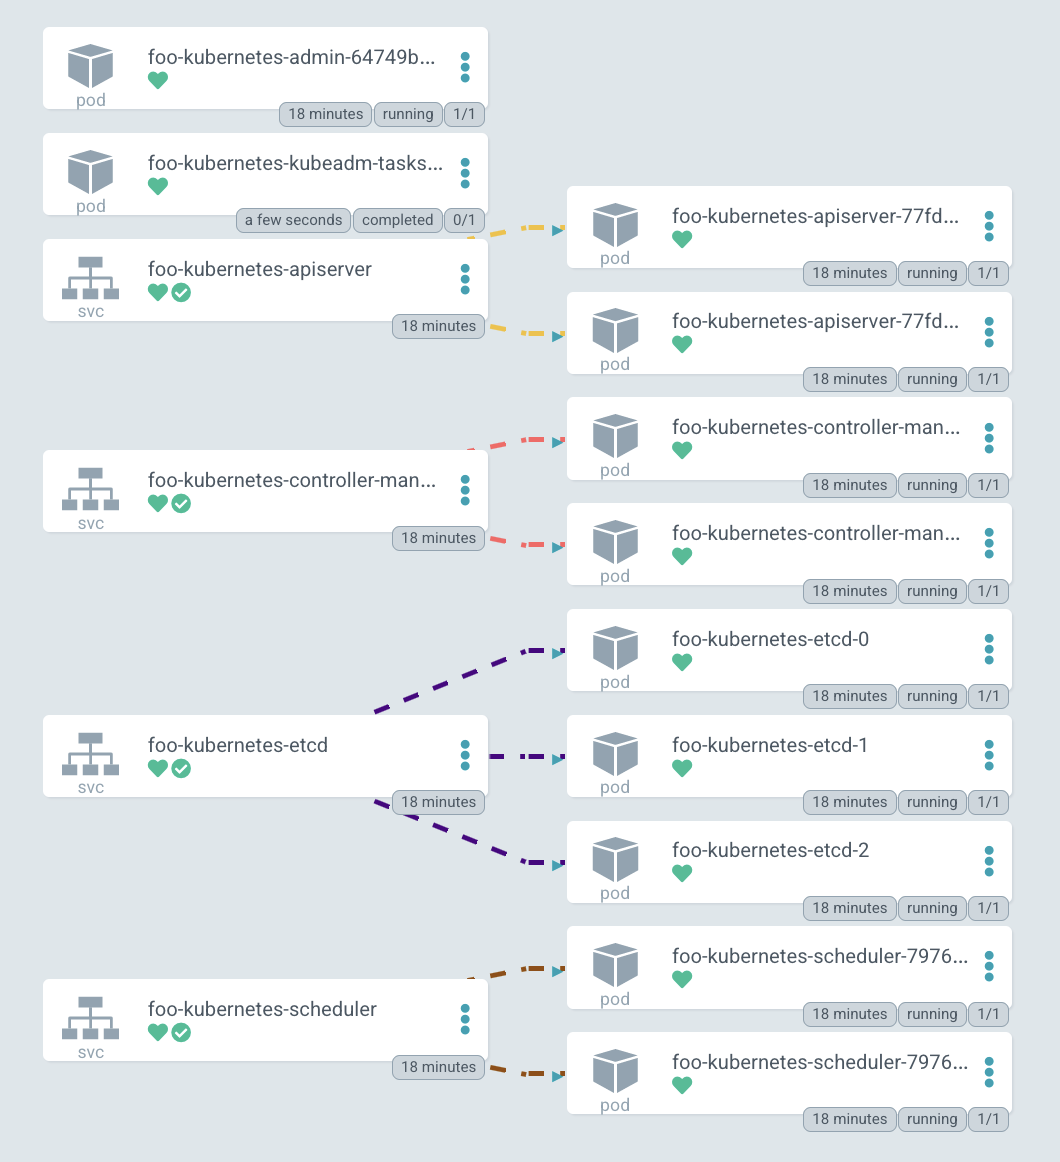
By the way, the diagram, is drawn in ArgoCD — the GitOps tool we use to manage our clusters, and cool diagrams are one of its features.
Orchestrating physical servers
OK, now you can see the way how is our Kubernetes control-plane deployed, but what about worker nodes, how are we adding them? As I already said, all our servers are bare metal. We do not use virtualization to run Kubernetes, but we orchestrate all physical servers by ourselves.
Also, we do use Linux network boot feature very actively. Moreover, this is exactly the booting, not some kind of automation of the installation. When the nodes are booting, they just run a ready-made system image for them. That is, to update any node, we just need to reboot it - and it will download a new image. It is very easy, simple and convenient.
For this, the Kubefarm project was created, which allows you to automate this. The most commonly used examples can be found in the examples directory. The most standard of them named generic. Let's take a look at values.yaml:
Here you can specify the parameters which are passed into the upstream Kubernetes-in-Kubernetes chart. In order for you control-plane to be accessible from the outside, it is enough to specify the IP address here, but if you wish, you can specify some DNS name here.
In the PXE server configuration you can specify a timezone. You can also add an SSH key for logging in without a password (but you can also specify a password), as well as kernel modules and parameters that should be applied during booting the system.
Next comes the nodePools configuration, i.e. the nodes themselves. If you've ever used a terraform module for gke, then this logic will remind you of it. Here you statically describe all nodes with a set of parameters:
Name (hostname);
MAC-addresses — we have nodes with two network cards, and each one can boot from any of the MAC addresses specified here.
IP-address, which the DHCP server should issue to this node.
In this example, you have two pools: the first has five nodes, the second has only one, the second pool has also two tags assigned. Tags are the way to describe configuration for specific nodes. For example, you can add specific DHCP options for some pools, options for the PXE server for booting (e.g. here is debug option enabled) and set of kubernetesLabels and kubernetesTaints options. What does that mean?
For example, in this configuration you have a second nodePool with one node. The pool has debug and foo tags assigned. Now see the options for foo tag in kubernetesLabels. This means that the m1c43 node will boot with these two labels and taint assigned. Everything seems to be simple. Now let's try this in practice.
Demo
Go to examples and update previously deployed chart to Kubefarm. Just use the generic parameters and look at the pods. You can see that a PXE server and one more job were added. This job essentially goes to the deployed Kubernetes cluster and creates a new token. Now it will run repeatedly every 12 hours to generate a new token, so that the nodes can connect to your cluster.

In a graphical representation, it looks about the same, but now apiserver started to be exposed outside.
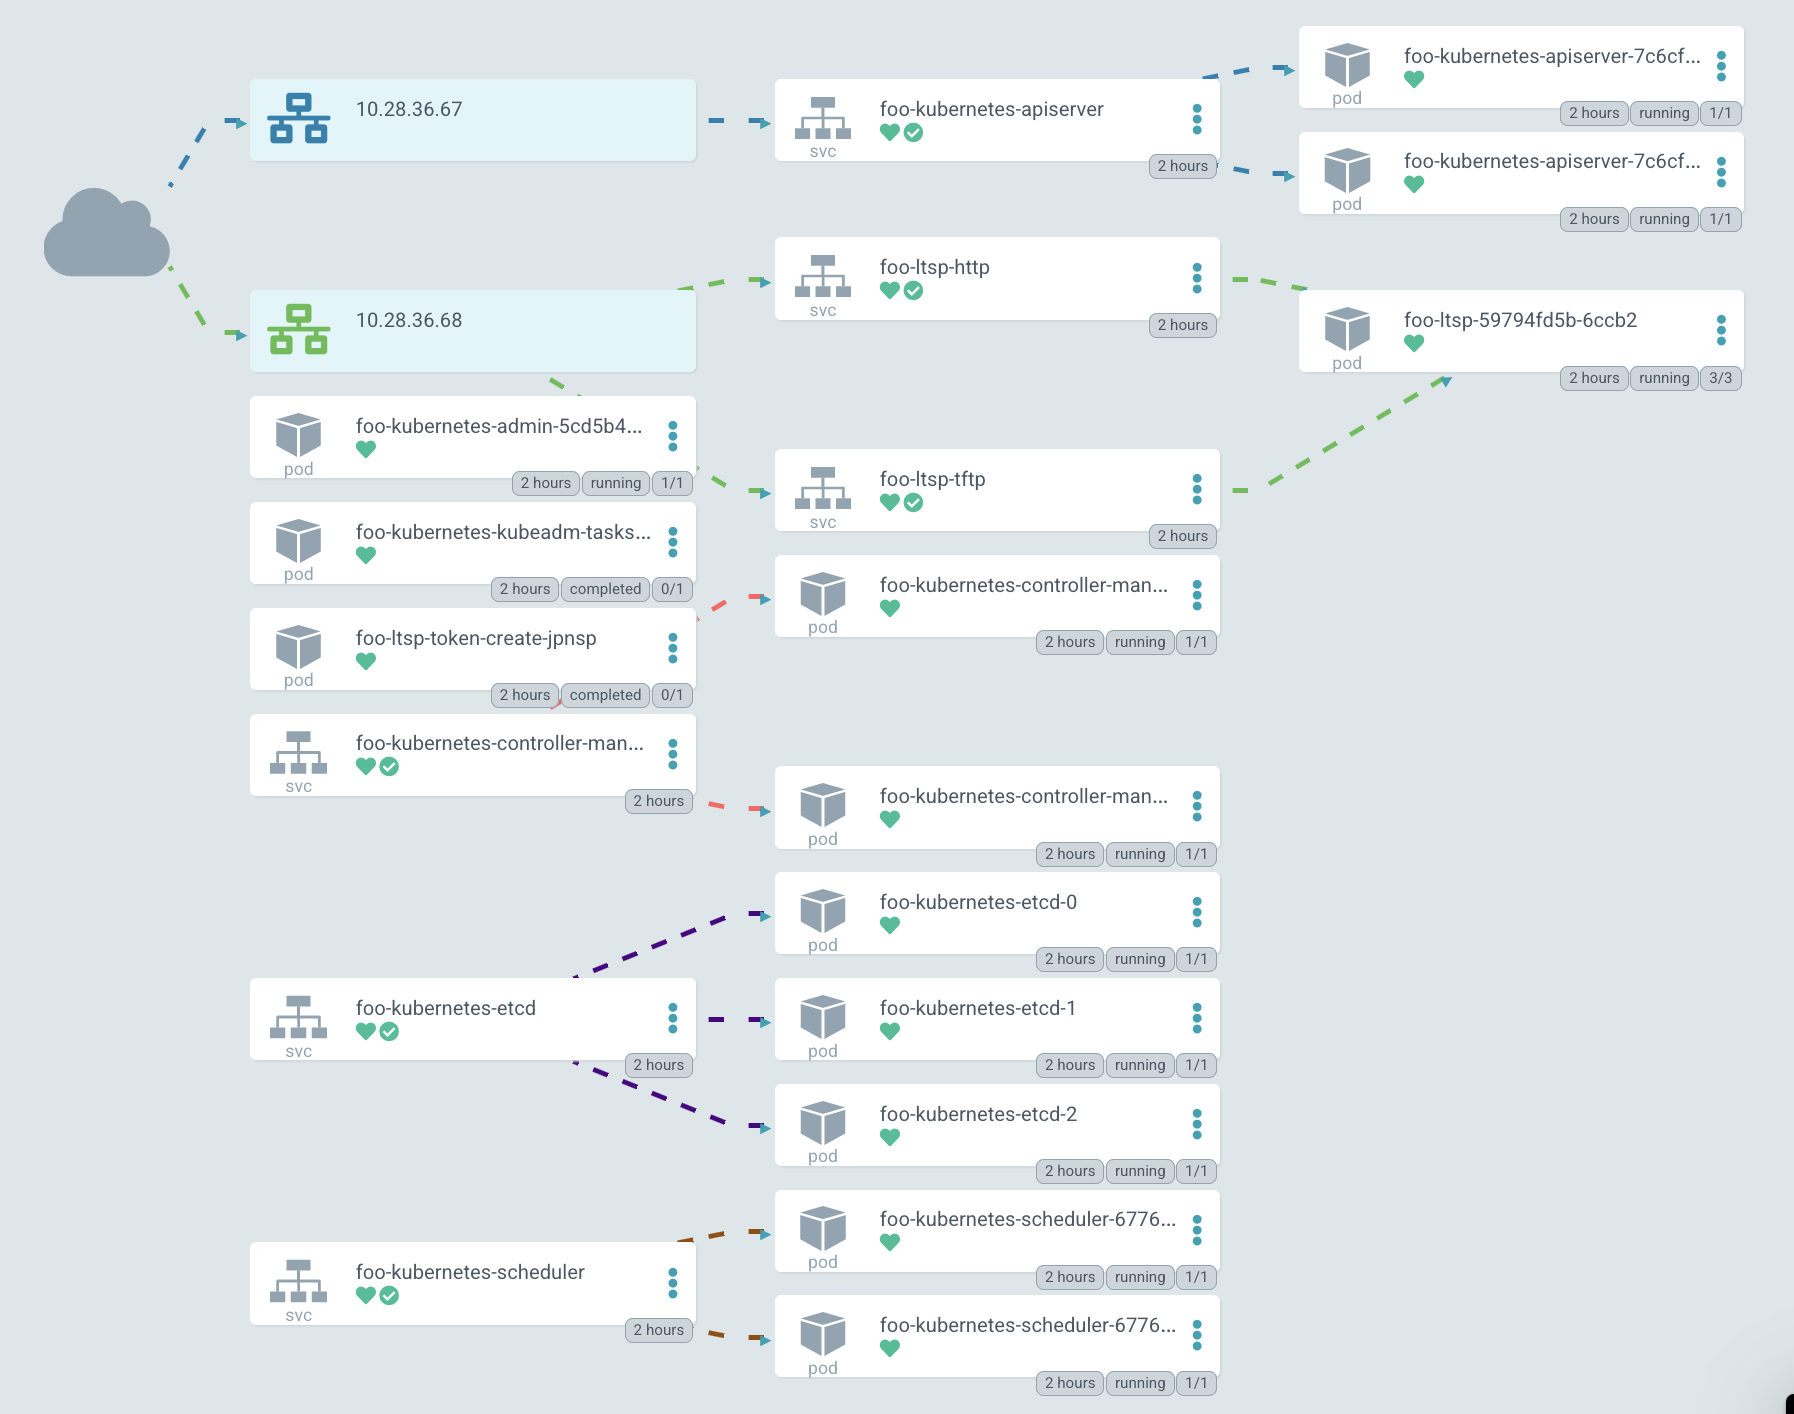
In the diagram, the IP is highlighted in green, the PXE server can be reached through it. At the moment, Kubernetes does not allow creating a single LoadBalancer service for TCP and UDP protocols by default, so you have to create two different services with the same IP address. One is for TFTP, and the second for HTTP, through which the system image is downloaded.
But this simple example is not always enough, sometimes you might need to modify the logic at boot. For example, here is a directory advanced_network, inside which there is a values file with a simple shell script. Let's call it network.sh:
All this script does is take environment variables at boot time, and generates a network configuration based on them. It creates a directory and puts the netplan config inside. For example, a bonding interface is created here. Basically, this script can contain everything you need. It can hold the network configuration or generate the system services, add some hooks or describe any other logic. Anything that can be described in bash or shell languages will work here, and it will be executed at boot time.
Let's see how it can be deployed. Let's pass the generic values file as the first parameter, and an additional values file as the second parameter. This is a standard Helm feature. This way you can also pass the secrets, but in this case, the configuration is just expanded by the second file:

Let's look at the configmap foo-kubernetes-ltsp for the netboot server and make sure that network.sh script is really there. These commands used to configure the network at boot time:

Here you can see how it works in principle. The chassis interface (we use HPE Moonshots 1500) have the nodes, you can enter show node list command to get a list of all the nodes. Now you can see the booting process.

You can also get their MAC addresses by show node macaddr all command. We have a clever operator that collects MAC-addresses from chassis automatically and passes them to the DHCP server. Actually, it's just creating custom configuration resources for dnsmasq-controller which is running in same admin Kubernetes cluster. Also, trough this interface you can control the nodes themselves, e.g. turn them on and off.
If you have no such opportunity to enter the chassis through iLO and collect a list of MAC addresses for your nodes, you can consider using catchall cluster pattern. Purely speaking, it is just a cluster with a dynamic DHCP pool. Thus, all nodes that are not described in the configuration to other clusters will automatically join to this cluster.

For example, you can see a special cluster with some nodes. They are joined to the cluster with an auto-generated name based on their MAC address. Starting from this point you can connect to them and see what happens there. Here you can somehow prepare them, for example, set up the file system and then rejoin them to another cluster.
Now let's try connecting to the node terminal and see how it is booting. After the BIOS, the network card is configured, here it sends a request to the DHCP server from a specific MAC address, which redirects it to a specific PXE server. Later the kernel and initrd image are downloaded from the server using the standard HTTP protocol:

After loading the kernel, the node downloads the rootfs image and transfers control to systemd. Then the booting proceeds as usual, and after that the node joins Kubernetes:

If you take a look at fstab, you can see only two entries there: /var/lib/docker and /var/lib/kubelet, they are mounted as tmpfs (in fact, from RAM). At the same time, the root partition is mounted as overlayfs, so all changes that you make here on the system will be lost on the next reboot.
Looking into the block devices on the node, you can see some nvme disk, but it has not yet been mounted anywhere. There is also a loop device - this is the exact rootfs image downloaded from the server. At the moment it is located in RAM, occupies 653 MB and mounted with the loop option.
If you look in /etc/ltsp, you find the network.sh file that was executed at boot. From containers, you can see running kube-proxy and pause container for it.

Details
Network Boot Image
But where does the main image come from? There is a little trick here. The image for the nodes is built through the Dockerfile along with the server. The Docker multi-stage build feature allows you to easily add any packages and kernel modules exactly at the stage of the image build. It looks like this:
What's going on here? First, we take a regular Ubuntu 20.04 and install all the packages we need. First of all we install the kernel, lvm, systemd, ssh. In general, everything that you want to see on the final node should be described here. Here we also install docker with kubelet and kubeadm, which are used to join the node to the cluster.
And then we perform an additional configuration. In the last stage, we simply install tftp and nginx (which serves our image to clients), grub (bootloader). Then root of the previous stages copied into the final image and generate squashed image from it. That is, in fact, we get a docker image, which has both the server and the boot image for our nodes. At the same time, it can be easily updated by changing the Dockerfile.
Webhooks and API aggregation layer
I want to pay special attention to the problem of webhooks and aggregation layer. In general, webhooks is a Kubernetes feature that allows you to respond to the creation or modification of any resources. Thus, you can add a handler so that when resources are applied, Kubernetes must send request to some pod and check if configuration of this resource is correct, or make additional changes to it.
But the point is, in order for the webhooks to work, the apiserver must have direct access to the cluster for which it is running. And if it is started in a separate cluster, like our case, or even separately from any cluster, then Konnectivity service can help us here. Konnectivity is one of the optional but officially supported Kubernetes components.
Let's take cluster of four nodes for example, each of them is running a kubelet and we have other Kubernetes components running outside: kube-apiserver, kube-scheduler and kube-controller-manager. By default, all these components interact with the apiserver directly - this is the most known part of the Kubernetes logic. But in fact, there is also a reverse connection. For example, when you want to view the logs or run a kubectl exec command, the API server establishes a connection to the specific kubelet independently:

But the problem is that if we have a webhook, then it usually runs as a standard pod with a service in our cluster. And when apiserver tries to reach it, it will fail because it will try to access an in-cluster service named webhook.namespace.svc being outside of the cluster where it is actually running:

And here Konnectivity comes to our rescue. Konnectivity is a tricky proxy server developed especially for Kubernetes. It can be deployed as a server next to the apiserver. And Konnectivity-agent is deployed in several replicas directly in the cluster you want to access. The agent establishes a connection to the server and sets up a stable channel to make apiserver able to access all webhooks and all kubelets in the cluster. Thus, now all communication with the cluster will take place through the Konnectivity-server:

Our plans
Of course, we are not going to stop at this stage. People interested in the project often write to me. And if there will be a sufficient number of interested people, I hope to move Kubernetes-in-Kubernetes project under Kubernetes SIGs, by representing it in form of the official Kubernetes Helm chart. Perhaps, by making this project independent we'll gather an even larger community.
I am also thinking of integrating it with the Machine Controller Manager, which would allow creating worker nodes, not only of physical servers, but also, for example, for creating virtual machines using kubevirt and running them in the same Kubernetes cluster. By the way, it also allows to spawn virtual machines in the clouds, and have a control-plane deployed locally.
I am also considering the option of integrating with the Cluster-API so that you can create physical Kubefarm clusters directly through the Kubernetes environment. But at the moment I'm not completely sure about this idea. If you have any thoughts on this matter, I'll be happy to listen to them.