This article is more than one year old. Older articles may contain outdated content. Check that the information in the page has not become incorrect since its publication.
Get started with Kubernetes (using Python)
So, you know you want to run your application in Kubernetes but don’t know where to start. Or maybe you’re getting started but still don’t know what you don’t know. In this blog you’ll walk through how to containerize an application and get it running in Kubernetes.
This walk-through assumes you are a developer or at least comfortable with the command line (preferably bash shell).
What we’ll do
- Get the code and run the application locally
- Create an image and run the application in Docker
- Create a deployment and run the application in Kubernetes
Prerequisites
- A Kubernetes service - I'm using Docker Desktop with Kubernetes in this walkthrough, but you can use one of the others. See Getting Started for a full listing.
- Python 3.7 installed
- Git installed
Containerizing an application
In this section you’ll take some source code, verify it runs locally, and then create a Docker image of the application. The sample application used is a very simple Flask web application; if you want to test it locally, you’ll need Python installed. Otherwise, you can skip to the "Create a Dockerfile" section.
Get the application code
Use git to clone the repository to your local machine:
git clone https://github.com/JasonHaley/hello-python.git
Change to the app directory:
cd hello-python/app
There are only two files in this directory. If you look at the main.py file, you’ll see the application prints out a hello message. You can learn more about Flask on the Flask website.
from flask import Flask
app = Flask(__name__)

@app.route("/")
def hello():
    return "Hello from Python!"

if __name__ == "__main__":
    app.run(host='0.0.0.0')
The requirements.txt file contains the list of packages needed by the main.py and will be used by pip to install the Flask library.
Note:
When you start writing more advanced Python, you'll find it's not always recommended to usepip install and may want to use virtualenv (or pyenv) to install your dependencies in a virtual environment.Run locally
Manually run the installer and application using the following commands:
pip install -r requirements.txt
python main.py
This will start a development web server hosting your application, which you will be able to see by navigating to http://localhost:5000. Because port 5000 is the default port for the development server, we didn’t need to specify it.
Create a Dockerfile
Now that you have verified the source code works, the first step in containerizing the application is to create a Dockerfile.
In the hello-python/app directory, create a file named Dockerfile with the following contents and save it:
FROM python:3.7

RUN mkdir /app
WORKDIR /app
ADD . /app/
RUN pip install -r requirements.txt

EXPOSE 5000
CMD ["python", "/app/main.py"]
This file is a set of instructions Docker will use to build the image. For this simple application, Docker is going to:
- Get the official Python Base Image for version 3.7 from Docker Hub.
- In the image, create a directory named app.
- Set the working directory to that new app directory.
- Copy the local directory’s contents to that new folder into the image.
- Run the pip installer (just like we did earlier) to pull the requirements into the image.
- Inform Docker the container listens on port 5000.
- Configure the starting command to use when the container starts.
Create an image
At your command line or shell, in the hello-python/app directory, build the image with the following command:
docker build -f Dockerfile -t hello-python:latest .
Note:
I'm using the :latest tag in this example, if you are not familiar with what it is you may want to read Docker: The latest Confusion.This will perform those seven steps listed above and create the image. To verify the image was created, run the following command:
docker image ls

The application is now containerized, which means it can now run in Docker and Kubernetes!
Running in Docker
Before jumping into Kubernetes, let’s verify it works in Docker. Run the following command to have Docker run the application in a container and map it to port 5001:
docker run -p 5001:5000 hello-python
Now navigate to http://localhost:5001, and you should see the “Hello from Python!” message.
More info
Running in Kubernetes
You are finally ready to get the application running in Kubernetes. Because you have a web application, you will create a service and a deployment.
First verify your kubectl is configured. At the command line, type the following:
kubectl version
If you don’t see a reply with a Client and Server version, you’ll need to install and configure it.
If you are running on Windows or Mac, make sure it is using the Docker for Desktop context by running the following:
kubectl config use-context docker-for-desktop
Now you are working with Kubernetes! You can see the node by typing:
kubectl get nodes
Now let’s have it run the application. Create a file named deployment.yaml and add the following contents to it and then save it:
apiVersion: v1
kind: Service
metadata:
  name: hello-python-service
spec:
  selector:
    app: hello-python
  ports:
  - protocol: "TCP"
    port: 6000
    targetPort: 5000
  type: LoadBalancer

---
apiVersion: apps/v1
kind: Deployment
metadata:
  name: hello-python
spec:
  selector:
    matchLabels:
      app: hello-python
  replicas: 4
  template:
    metadata:
      labels:
        app: hello-python
    spec:
      containers:
      - name: hello-python
        image: hello-python:latest
        imagePullPolicy: Never
        ports:
        - containerPort: 5000
This YAML file is the instructions to Kubernetes for what you want running. It is telling Kubernetes the following:
- You want a load-balanced service exposing port 6000
- You want four instances of the hello-python container running
Use kubectl to send the YAML file to Kubernetes by running the following command:
kubectl apply -f deployment.yaml
You can see the pods are running if you execute the following command:
kubectl get pods
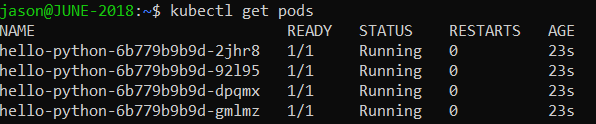
Now navigate to http://localhost:6000, and you should see the “Hello from Python!” message.
That’s it! The application is now running in Kubernetes!
More Info
Summary
In this walk-through, we containerized an application, and got it running in Docker and in Kubernetes. This simple application only scratches the surface of what’s possible (and what you’ll need to learn).
Next steps
If you are just getting started and this walk-through was useful to you, then the following resources should be good next steps for you to further expand your Kubernetes knowledge:
- Introduction to Microservices, Docker, and Kubernetes - 55-minute video by James Quigley
- This is a great place to start because it provides more information than I could here.
- Containerize your Apps with Docker and Kubernetes - free e-book by Dr Gabriel N Schenker
- This is my favorite book on Docker and Kubernetes.
- Kubernetes Learning Path: 50 days from zero to hero with Kubernetes - on Microsoft’s site
- This is a 10-page pdf that has tons of links to videos (with Brendan Burns), documentation sites, and a really good workshop for Azure Kubernetes Service.
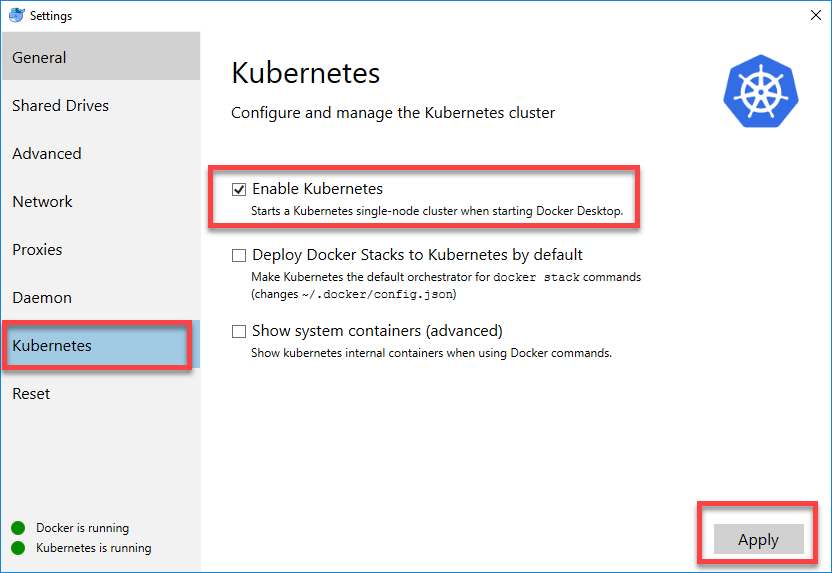
How to enable Kubernetes in Docker Desktop
Once you have Docker Desktop installed, open the Settings:
Select the Kubernetes menu item on the left and verify that the Enable Kubernetes is checked. If it isn’t, check it and click the Apply button at the bottom right: