This article is more than one year old. Older articles may contain outdated content. Check that the information in the page has not become incorrect since its publication.
Airflow on Kubernetes (Part 1): A Different Kind of Operator
Introduction
As part of Bloomberg's continued commitment to developing the Kubernetes ecosystem, we are excited to announce the Kubernetes Airflow Operator; a mechanism for Apache Airflow, a popular workflow orchestration framework to natively launch arbitrary Kubernetes Pods using the Kubernetes API.
What Is Airflow?
Apache Airflow is one realization of the DevOps philosophy of "Configuration As Code." Airflow allows users to launch multi-step pipelines using a simple Python object DAG (Directed Acyclic Graph). You can define dependencies, programmatically construct complex workflows, and monitor scheduled jobs in an easy to read UI.
Why Airflow on Kubernetes?
Since its inception, Airflow's greatest strength has been its flexibility. Airflow offers a wide range of integrations for services ranging from Spark and HBase, to services on various cloud providers. Airflow also offers easy extensibility through its plug-in framework. However, one limitation of the project is that Airflow users are confined to the frameworks and clients that exist on the Airflow worker at the moment of execution. A single organization can have varied Airflow workflows ranging from data science pipelines to application deployments. This difference in use-case creates issues in dependency management as both teams might use vastly different libraries for their workflows.
To address this issue, we've utilized Kubernetes to allow users to launch arbitrary Kubernetes pods and configurations. Airflow users can now have full power over their run-time environments, resources, and secrets, basically turning Airflow into an "any job you want" workflow orchestrator.
The Kubernetes Operator
Before we move any further, we should clarify that an Operator in Airflow is a task definition. When a user creates a DAG, they would use an operator like the "SparkSubmitOperator" or the "PythonOperator" to submit/monitor a Spark job or a Python function respectively. Airflow comes with built-in operators for frameworks like Apache Spark, BigQuery, Hive, and EMR. It also offers a Plugins entrypoint that allows DevOps engineers to develop their own connectors.
Airflow users are always looking for ways to make deployments and ETL pipelines simpler to manage. Any opportunity to decouple pipeline steps, while increasing monitoring, can reduce future outages and fire-fights. The following is a list of benefits provided by the Airflow Kubernetes Operator:
Increased flexibility for deployments:
Airflow's plugin API has always offered a significant boon to engineers wishing to test new functionalities within their DAGs. On the downside, whenever a developer wanted to create a new operator, they had to develop an entirely new plugin. Now, any task that can be run within a Docker container is accessible through the exact same operator, with no extra Airflow code to maintain.Flexibility of configurations and dependencies: For operators that are run within static Airflow workers, dependency management can become quite difficult. If a developer wants to run one task that requires SciPy and another that requires NumPy, the developer would have to either maintain both dependencies within all Airflow workers or offload the task to an external machine (which can cause bugs if that external machine changes in an untracked manner). Custom Docker images allow users to ensure that the tasks environment, configuration, and dependencies are completely idempotent.
Usage of kubernetes secrets for added security: Handling sensitive data is a core responsibility of any DevOps engineer. At every opportunity, Airflow users want to isolate any API keys, database passwords, and login credentials on a strict need-to-know basis. With the Kubernetes operator, users can utilize the Kubernetes Vault technology to store all sensitive data. This means that the Airflow workers will never have access to this information, and can simply request that pods be built with only the secrets they need.
Architecture
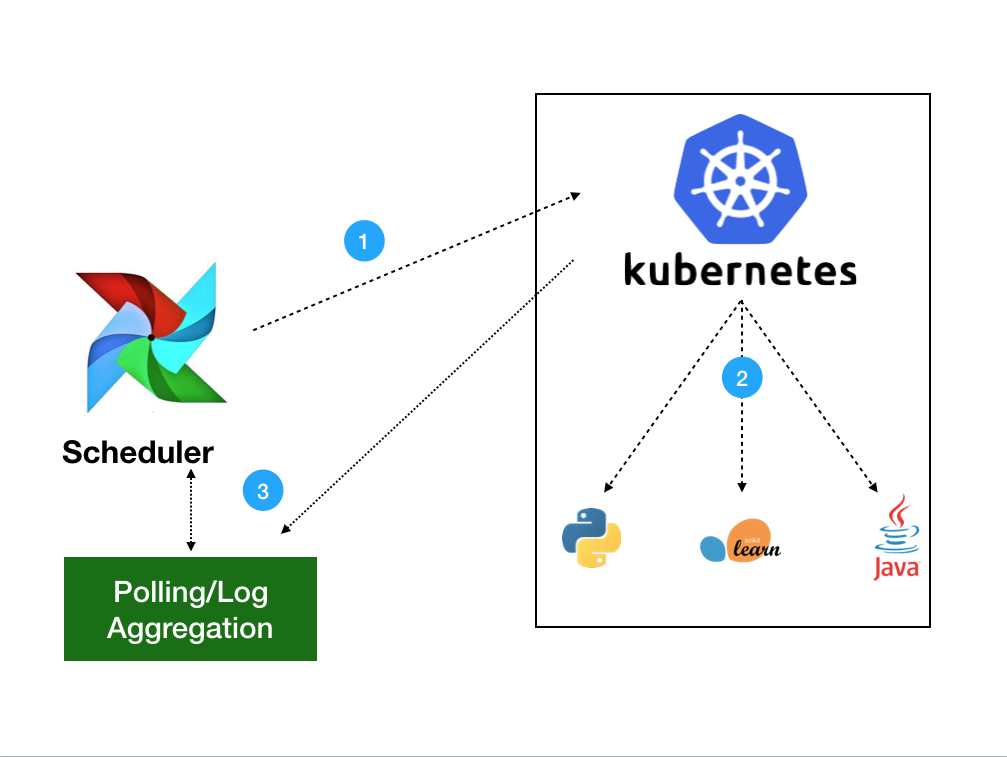
The Kubernetes Operator uses the Kubernetes Python Client to generate a request that is processed by the APIServer (1). Kubernetes will then launch your pod with whatever specs you've defined (2). Images will be loaded with all the necessary environment variables, secrets and dependencies, enacting a single command. Once the job is launched, the operator only needs to monitor the health of track logs (3). Users will have the choice of gathering logs locally to the scheduler or to any distributed logging service currently in their Kubernetes cluster.
Using the Kubernetes Operator
A Basic Example
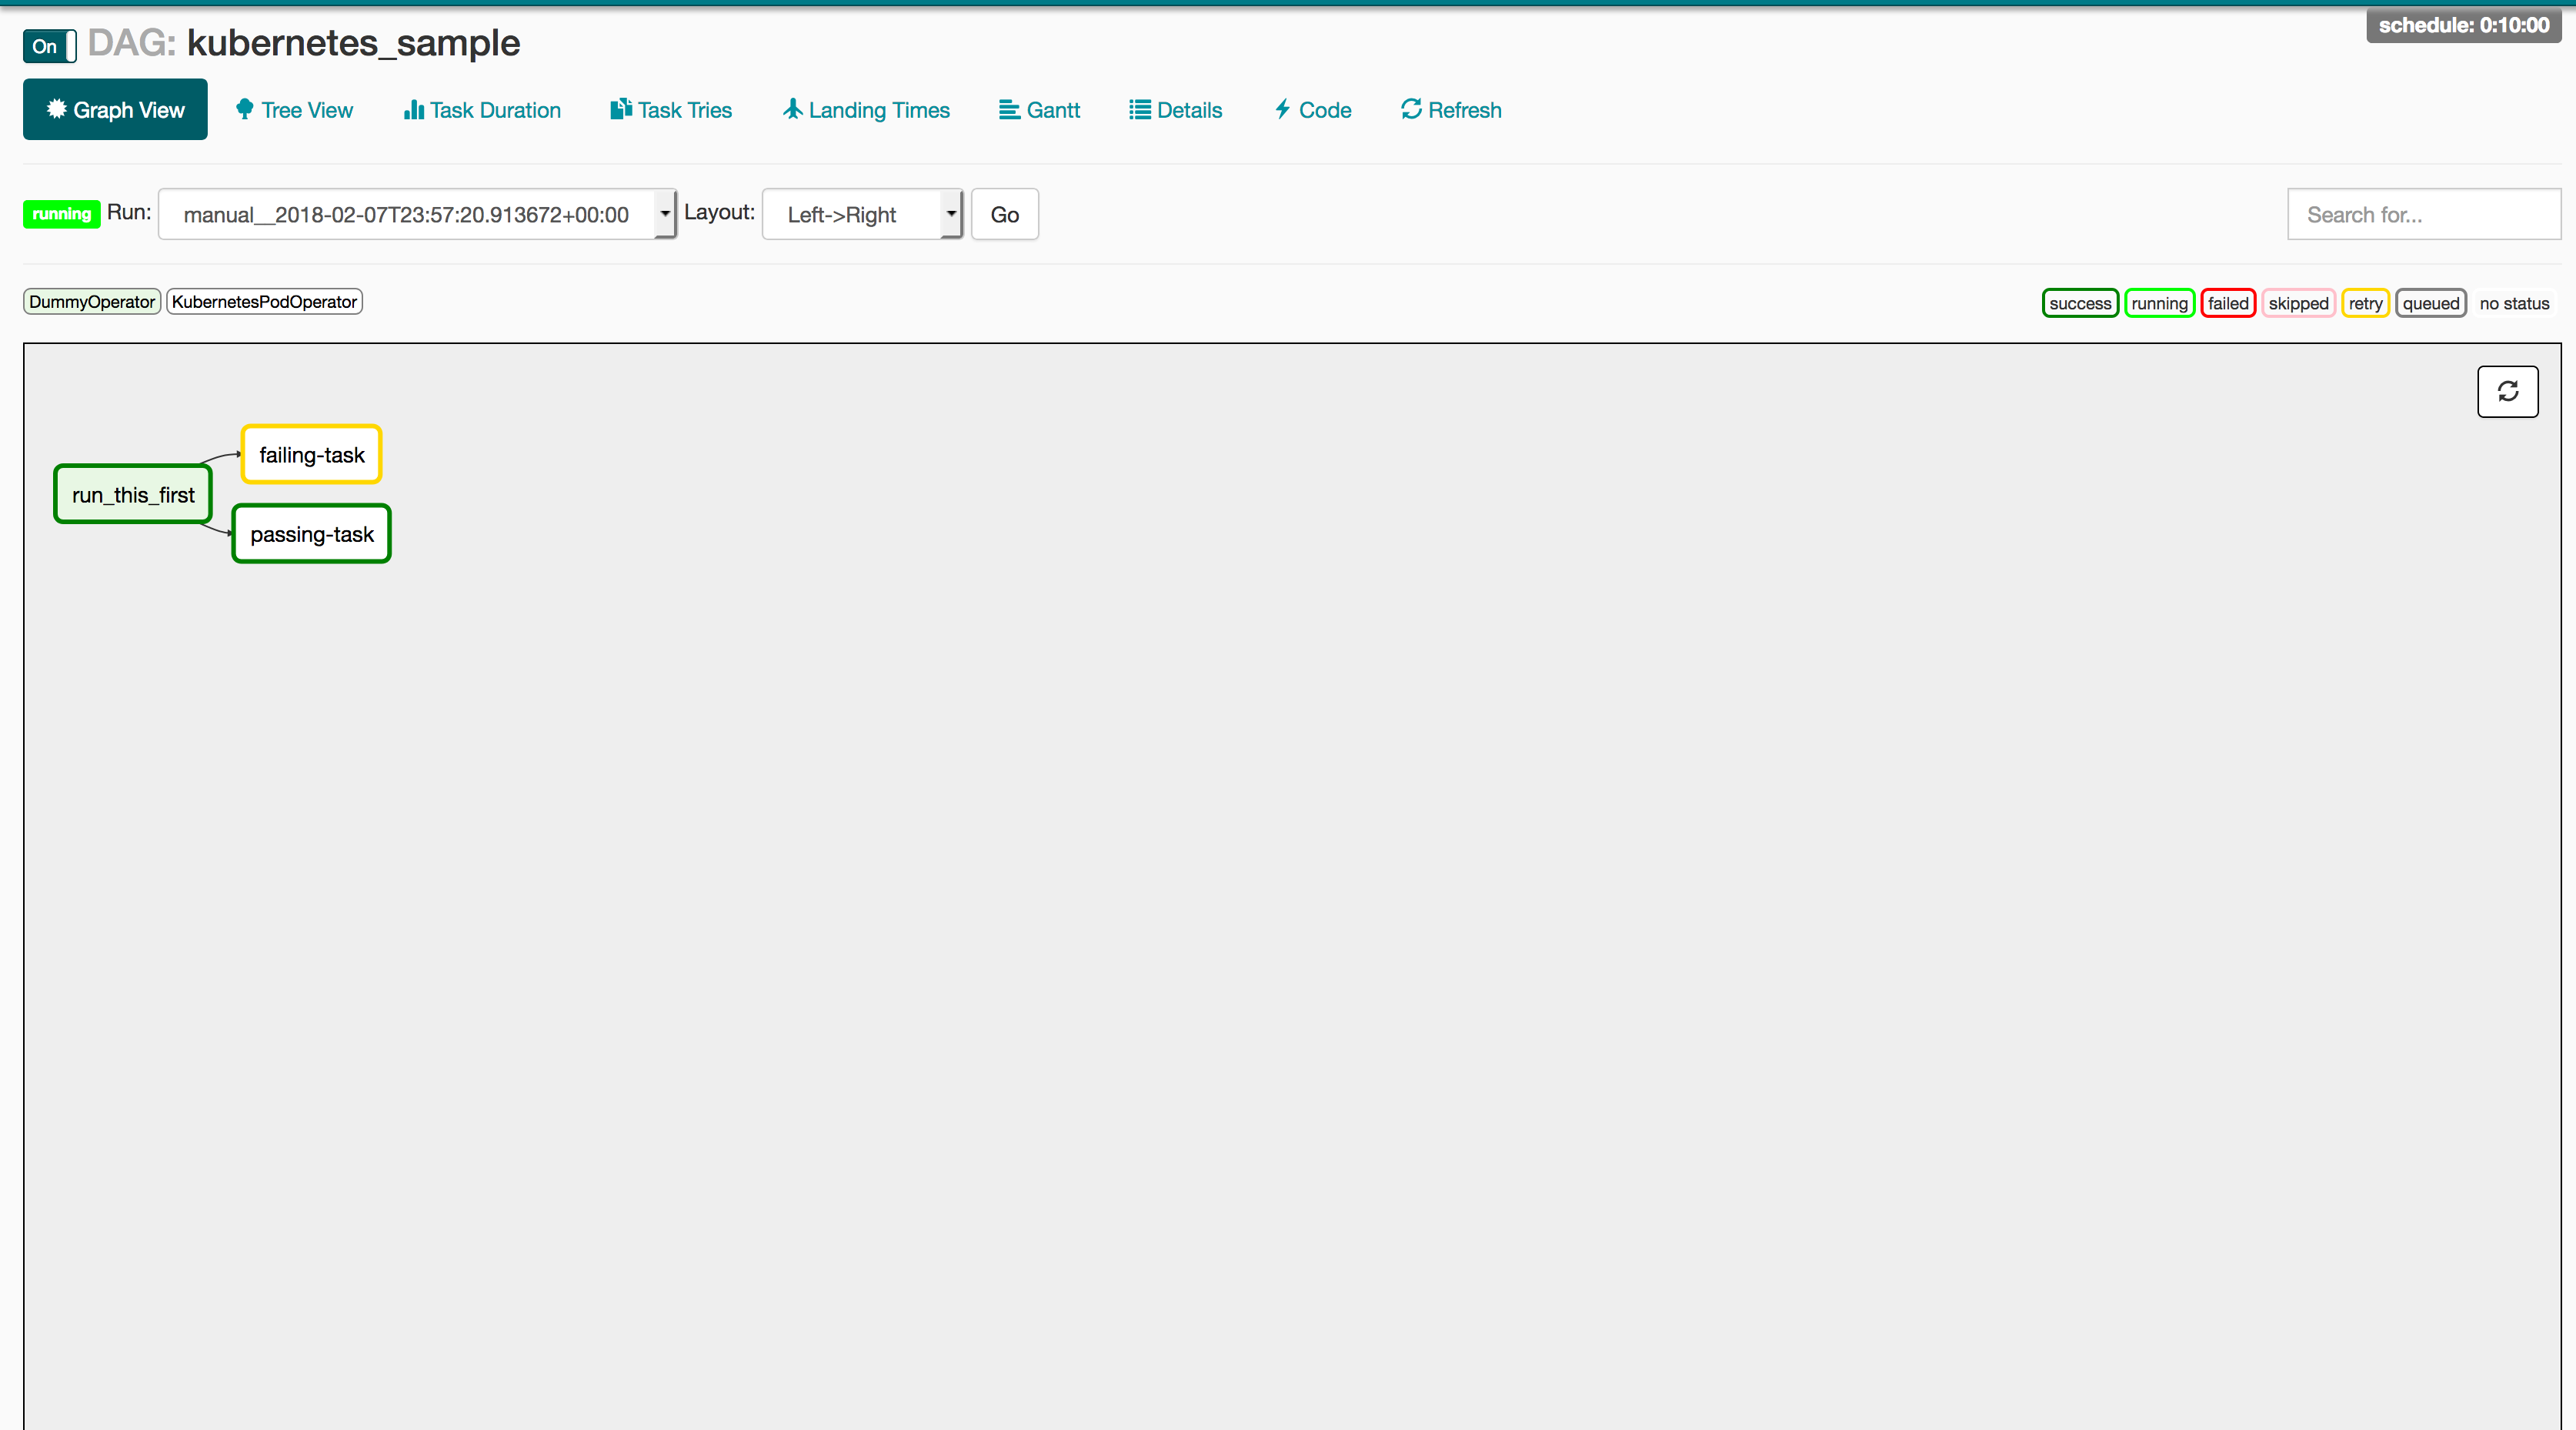
The following DAG is probably the simplest example we could write to show how the Kubernetes Operator works. This DAG creates two pods on Kubernetes: a Linux distro with Python and a base Ubuntu distro without it. The Python pod will run the Python request correctly, while the one without Python will report a failure to the user. If the Operator is working correctly, the passing-task pod should complete, while the failing-task pod returns a failure to the Airflow webserver.
from airflow import DAG
from datetime import datetime, timedelta
from airflow.contrib.operators.kubernetes_pod_operator import KubernetesPodOperator
from airflow.operators.dummy_operator import DummyOperator


default_args = {
    'owner': 'airflow',
    'depends_on_past': False,
    'start_date': datetime.utcnow(),
    'email': ['airflow@example.com'],
    'email_on_failure': False,
    'email_on_retry': False,
    'retries': 1,
    'retry_delay': timedelta(minutes=5)
}

dag = DAG(
    'kubernetes_sample', default_args=default_args, schedule_interval=timedelta(minutes=10))


start = DummyOperator(task_id='run_this_first', dag=dag)

passing = KubernetesPodOperator(namespace='default',
                          image="Python:3.6",
                          cmds=["Python","-c"],
                          arguments=["print('hello world')"],
                          labels={"foo": "bar"},
                          name="passing-test",
                          task_id="passing-task",
                          get_logs=True,
                          dag=dag
                          )

failing = KubernetesPodOperator(namespace='default',
                          image="ubuntu:1604",
                          cmds=["Python","-c"],
                          arguments=["print('hello world')"],
                          labels={"foo": "bar"},
                          name="fail",
                          task_id="failing-task",
                          get_logs=True,
                          dag=dag
                          )

passing.set_upstream(start)
failing.set_upstream(start)
But how does this relate to my workflow?
While this example only uses basic images, the magic of Docker is that this same DAG will work for any image/command pairing you want. The following is a recommended CI/CD pipeline to run production-ready code on an Airflow DAG.
1: PR in github
Use Travis or Jenkins to run unit and integration tests, bribe your favorite team-mate into PR'ing your code, and merge to the master branch to trigger an automated CI build.
2: CI/CD via Jenkins -> Docker Image
Generate your Docker images and bump release version within your Jenkins build.
3: Airflow launches task
Finally, update your DAGs to reflect the new release version and you should be ready to go!
production_task = KubernetesPodOperator(namespace='default',
                          # image="my-production-job:release-1.0.1", <-- old release
                          image="my-production-job:release-1.0.2",
                          cmds=["Python","-c"],
                          arguments=["print('hello world')"],
                          name="fail",
                          task_id="failing-task",
                          get_logs=True,
                          dag=dag
                          )
Launching a test deployment
Since the Kubernetes Operator is not yet released, we haven't released an official helm chart or operator (however both are currently in progress). However, we are including instructions for a basic deployment below and are actively looking for foolhardy beta testers to try this new feature. To try this system out please follow these steps:
Step 1: Set your kubeconfig to point to a kubernetes cluster
Step 2: Clone the Airflow Repo:
Run git clone https://github.com/apache/incubator-airflow.git to clone the official Airflow repo.
Step 3: Run
To run this basic deployment, we are co-opting the integration testing script that we currently use for the Kubernetes Executor (which will be explained in the next article of this series). To launch this deployment, run these three commands:
sed -ie "s/KubernetesExecutor/LocalExecutor/g" scripts/ci/kubernetes/kube/configmaps.yaml
./scripts/ci/kubernetes/Docker/build.sh
./scripts/ci/kubernetes/kube/deploy.sh
Before we move on, let's discuss what these commands are doing:
sed -ie "s/KubernetesExecutor/LocalExecutor/g" scripts/ci/kubernetes/kube/configmaps.yaml
The Kubernetes Executor is another Airflow feature that allows for dynamic allocation of tasks as idempotent pods. The reason we are switching this to the LocalExecutor is simply to introduce one feature at a time. You are more then welcome to skip this step if you would like to try the Kubernetes Executor, however we will go into more detail in a future article.
./scripts/ci/kubernetes/Docker/build.sh
This script will tar the Airflow master source code build a Docker container based on the Airflow distribution
./scripts/ci/kubernetes/kube/deploy.sh
Finally, we create a full Airflow deployment on your cluster. This includes Airflow configs, a postgres backend, the webserver + scheduler, and all necessary services between. One thing to note is that the role binding supplied is a cluster-admin, so if you do not have that level of permission on the cluster, you can modify this at scripts/ci/kubernetes/kube/airflow.yaml
Step 4: Log into your webserver
Now that your Airflow instance is running let's take a look at the UI! The UI lives in port 8080 of the Airflow pod, so simply run
WEB=$(kubectl get pods -o go-template --template '{{range .items}}{{.metadata.name}}{{"\n"}}{{end}}' | grep "airflow" | head -1)
kubectl port-forward $WEB 8080:8080
Now the Airflow UI will exist on http://localhost:8080. To log in simply enter airflow/airflow and you should have full access to the Airflow web UI.
Step 5: Upload a test document
To modify/add your own DAGs, you can use kubectl cp to upload local files into the DAG folder of the Airflow scheduler. Airflow will then read the new DAG and automatically upload it to its system. The following command will upload any local file into the correct directory:
kubectl cp <local file> <namespace>/<pod>:/root/airflow/dags -c scheduler
Step 6: Enjoy!
So when will I be able to use this?
While this feature is still in the early stages, we hope to see it released for wide release in the next few months.
Get Involved
This feature is just the beginning of multiple major efforts to improves Apache Airflow integration into Kubernetes. The Kubernetes Operator has been merged into the 1.10 release branch of Airflow (the executor in experimental mode), along with a fully k8s native scheduler called the Kubernetes Executor (article to come). These features are still in a stage where early adopters/contributors can have a huge influence on the future of these features.
For those interested in joining these efforts, I'd recommend checkint out these steps:
- Join the airflow-dev mailing list at dev@airflow.apache.org.
- File an issue in Apache Airflow JIRA
- Join our SIG-BigData meetings on Wednesdays at 10am PST.
- Reach us on slack at #sig-big-data on kubernetes.slack.com
Special thanks to the Apache Airflow and Kubernetes communities, particularly Grant Nicholas, Ben Goldberg, Anirudh Ramanathan, Fokko Dreisprong, and Bolke de Bruin, for your awesome help on these features as well as our future efforts.